Friday, May 31, 2013

Grab Life by the Beans!

I love the Paper Smooches line of stamps.  They are just the right amount of cute for me!

This card was made with the Cyber Cafe set which is just so darned adorable and so easily "usable".  I don't know about you....but I sometimes by sets of stamps and then find them a bit difficult to work with or I use one stamp out of the set but never go back.  Not the case with the Paper Smooches line.  They just seem to work well here on the Avenue! ;)

I CASED this card from one that was a sample for an upcoming Archiver's class and just added a couple of little of my own touches.  I loved the way it turned out....and once again...this card is amazing flat and easy to mail!  I usually bulk my cards up so much I can barely get them in a standard envelope! LOL!!!

Well, that's it for today, chickees!
Hope you had a great week and that the weekend has something special in store for you.

Happy Crafting!


Wednesday, May 29, 2013

Happy Birthday Card Creation

And a Happy Memorial Day Week to everyone!  I hope everyone had a nice day with maybe a little time to reflect on why we celebrate Memorial Day.

I continue on my own challenge to use up supplies I have including the fabulous March Simon Says Stamp Card Kit.  I loved the stamp set that came with it...but I've enjoyed all the SSS exclusive sets.  They are great quality!

I stamped this non bulked up card with various inks...some Stampin' Up, some Hero Arts and your guess is as good as mine! :)  The sentiment is Paper Smooches.

 I added a little bling to it and mounted the white cardstock on some black and was done!

And then I took a few of the extra 6x6 sheets of printed paper from the kit that I hadn't used and made a few envelopes with my We R Memory Keepers Envelope Punch Board.  These will hold gift cards or gift enclosures.  A great way to use up pieces of paper!


I've entered this in the following challenges:

Bearly Mine Challenge: Spring/Summer Colors
Simon Says Stamp Challenge: Anything Goes


On a side note...my son proposed to his girlfriend on Sunday and here are a few pictures of the big proposal.  It was so sweet....my son had arranged for all family to be there (her parents, his parents, sister, brothers, niece, nephew, etc.)  That was no small feat as were all had to be down at the beach...over 400 miles away.  Although the parents knew it was a surprise to the others including his new fiance so that was very fun.


It's so much fun seeing our kids grow up and become adults but let me tell you....there is a very bittersweet quality to it, too!!! :)

But life IS good!

Happy Crafting!


Sunday, May 26, 2013

More Fun with Simon Says Stamp!

I am still on my mission to use up supplies that come with the Simon Says Stamp Card Kits.  It is quite a task as SO MUCH STUFF is included in each kit!  Not complaining....just stating fact, ma'am!
Anyway, I am continuing with my fun with the March kit which you can see here:

Here is a card I made with some of the contents as well one of the little Kraft envelopes that came with the February card kit. 

The sentiment was stamped on a Lawn Fawn sticker and then I just punched some assorted hearts out of some of the paper that came with the kit with a Martha Stewart punch.

I made a little card to be inserted with another sentiment from the set as well as some Washi tape (that also came with the kit, too).

I love this wood grain paper:
Fast and easy!

Happy Crafting!

Wednesday, May 22, 2013

Life is Good!

Life is great, isn't it?

After I pretty much exhausted the supplies of my Simon Says Stamp Card Kits for January and February I went on to March.  Oh, how I love the colors of this kit.  
Here is what the kit looks like:

It is filled with a great stamp set (LOVE IT!) as well as some great Lawn Fawn papers and fun things! Unfortunately the kit is sold out although there are other kits from other months still available.  Follow that?

I've already made a few cards....Here and Here with it. 

I don't often participate in challenges because generally I am too lazy for all that linking up but I decided to participate in the Mojo Monday 294 challenge HERE.  Here is the challenge sketch:


 And here is my take on the challenge sketch:


My approach was pretty straight forward but I just had to add something to the top of the card.  You know how it is...sometimes things JUST NEED SOMETHING!

Oh, heck....I'm going to add another card here I made with the same kit.  This is a nearly exact copy of a card Vicky of Clips -n- Cuts made a little while ago.  If you haven't watched her video HERE you might want to take a peek.  She whipped out the pinwheel in no time.  I tried to follow her lead but I ended up wrestling with my pinwheel, tearing paper, making holes and had to cover up many mistakes.  She made it look so easy.  I was not saying nice things while I was making this!   LOL!  I am just amazed at how simple Vicky makes a task look!  HAHA!

The card turned out cute...but my oh my....I felt like a contortionist trying to get that little pinwheel just right.  Thank God for Gluedots (lots of 'em) and gems that are big enough to cover up holes in paper that shouldn't be there! :)  Oh...and the sentiment is from Paper Smooches.


But no matter what...it is always fun to create, isn't it?

Happy Crafting!


Tuesday, May 21, 2013

Project Life: Week 20

(For you Project Lifers out there...if you want to take a look at all my pages to date you can go to the Project Life 2013 tab just above this post.  It will take you to photos of all my pages.) 

Uh, Yeah.....I'm up to date!  (She brags...)

I decided to be a bit lazy and photograph THROUGH my page protectors this week.  Mostly because I wanted to give you a glimpse of how impressive my book is looking.  I mean...it is just so thick and meaty! Love it!

Here are my Week 20 layouts side by side:

This was a week for the kids....they had lots of fun things going on including a trip with Omie to Stone Mountain.

Here is the left side:


My week card was done with a Silhouette cut from the online store with some Thickers stickers (for the numbers) and a sticker from a Fancy Pants kit that was LEFTOVER!  I am loving using leftover stuff for my Project Life.  


We took the skylift to the top of Stone Mountain and David loved it.  He kept saying "This is awesome!".  Love that 3 1/2 year old.  I used a Lily Pad template for my photo and then just added part of a journaling card to the edge.


Here is the right side:


This card was included with my leftover kit and I just added some rub-ons to the card.  Simple and DONE!


Sometimes it's nice to add a little memorabilia so I added in our Skyride tickets.


The following two photos were also done with templates from Lilypad.  I use Photoshop Elements to drop my photos into the templates.  It's pretty easy and I love that it helps you get more photos on your layout.  Let your photos do the talking, I say!

I added a few stickers to this one:
 

I loved the Who, What, When, Where approach to this card.  And I added a few rub-ons to this as well.  

And that's it for today....

Happy Crafting!

Monday, May 20, 2013

Moving Right Along....

....I've been on a mission to use up the products that came with my Simon Says Stamp Card Kits.  I have pretty much used up all the January product so now I am on to the February kit.

I loved that kit....the papers were so pretty and the stamp set was absolutely the best.  I have made so many cards with it....and it is a set that I know I will reach for again and again!  I just love the little dresses...and the little hanger....and the flowers are wonderful.

Here is the stamp set:

And here is the monthly kit:

Here is one card I made with the kit which I posted a while back.  I loved this card.  And now I've made several more.  Here is the first one I want to share:


I love that big whimsical flower.  I stamped it 9 times with Versamark and then heat embossed it with some white embossing powder.  I cut the various layers out and stacked them to give the flower a bit more dimension and I added some little pearls to the center.

Here you can see the layers a bit better:
It was fun and pretty fast and I love the way it ended up looking.  What a fun card....and I love the way the sentiment looks, too, with the 2 styles of script.  Very cool...so chic! :)

I've made several other cards which I will share the next few days....you lucky readers!

I am entering the following challenges: 
Simon Says Stamp Challenge: Flower Power.
Simon Says Stamp and Show Challenge: Favorite Ink....a hard one to choose there....but I think my all time favorite for versatility is Versamark!

And wahoo....I finished my Week 20 for Project Life!  I am up to date!!!  Amazing! 

Hope everyone has a fabulous week and has a bit of time to enjoy some creating!

Happy Crafting!

Sunday, May 19, 2013

Thinking of You


 This is the last card I am posting that I created with the Simon Says Stamp January card kit.  I promise.  I know  you are tired of seeing them.  I'm tired of making them. NOT!  And I hope you aren't tired of seeing them.
I love those little tickets...they are from Tim Holtz and I just stamped on it with some VersaFine ink.

A few layers...a little knotted gingham ribbon and done!  Simple and easy.

My husband who is not the most artistic or creative person would probably look at this and say it is dirty looking.

I made him a mini album a few years back which was distressed..inked and grungy..  Sent it to him while he was tending to some family business and was out of town and he said he liked it but it looked a bit dirty to him.  LOL! God love him!

Fertig! (German for "Finished" if you didn't know...)

Done.  Over and out!

Happy Crafting!

Saturday, May 18, 2013

Project Life: Week 19


Well, my goodness....7 more weeks and we Project Lifers will be at the halfway mark of this year!   (I'm already growing out of my Project Life album....time to go to Volume II!

Here are my Week 19 layouts.  You know...last week I did a more involved layout with all that stamping with Hero Arts so decided to take the quick and easy approach this week.  I went to my stash and found some leftover stuff from a Simple Stories kit called Fabulous.

This all came together very quickly....I was done with the whole think in about an hour (OK, maybe an hour and a half!).

For my journaling card below I simply (love that word) layered a couple of things and added ribbon.  I am sorry but I just cannot have totally flat.  Just can't do it! LOL!  Not with paper, anyway!


My week card...shown below...was just a filler card I added some stickers to.  Fast and simple (using that word again!)
 I cut an arrow with my Silhouette and have it pointing to David.  This is a terrible picture but Project Life is about documenting snippets of your lives....this photo was taken through a one way mirror at his Mother's Morning Out program....here he is with his "fwends" sitting on a mat listening to story time.  I just love seeing him engaged in activities like this.  He and his "fwends" are just 3 years old.  :)
I couldn't NOT include that picture, you know?

Below is a collage photo done with a template from The Lily Pad.  There are some wonderful, wonderful collage templates for 4x6 and 3x4 photos.  They are a great way to get more photos on your layouts, I think, and are easily done in Photoshop or Photoshop Elements if you  have basic skills in those programs.


Here's another photo collage below of our little girl, Taylor, who doesn't mind getting down and dirty!
I just added a couple of stickers and some baker's twine to it.

These collages are also a great way to use "not-so-great" photos and ending up creating a better visual impact (I think).

Here is the right side:

The bottom right photo is another collage and I just added a few stickers to pep it up a bit.


I added another arrow cut with my Silhouette to the journaling card as well as a few cardstock stickers.


Simple Stories....that is the manufacturer of this kit and it does live by its name.  This was very SIMPLE to do.  Sometimes simple is all you need!


Thursday, May 16, 2013

More with Simon Says Stamp's January Card Kit

I have still been working with the January card kit from Simon Says Stamp.    I ended up making about 6 cards, I think, with this kit and still have a few sheets of paper left.  Fun!  Great value and I love the stamps that were included. 

Here is another card I made with it:

Oh, uh, yeah....it is a cut out card...something I don't do often enough!  I used a Spellbinder scallop circle and a regular circle to cut out the shapes and a Fiskars scallop punch for the smallest scallop.  The Kraft sticker came with the card kit and I just inked it with some black VersaFine ink.
This is how it looks closed:
And when you open the card this is what you see:

I love the way it turned out and just might have to CASE myself on this. HAHA!

It was fun to do!  I like fun!  I like value and I think the SSS kits are a tremendous value! 


Lots of ! in that last line! 

!!!!

Happy Crafting....

Wednesday, May 15, 2013

Back to a Card or Two...

As I've been working on my Project Life I've also found a little time to whip out a card or two.  And my challenge has been to use WHAT I HAVE HERE! LOL! What a novel idea.  USE what I have rather than adding to the collection!

I have been receiving the Simon Says Stamp Card Kit of the Month.  I love it.  The value is great....the stamp set that is included is wonderful...and I love the little things that are included with the papers for card making.  It has been a really fun challenge for me.  So....since I have a few boxes stacked up I decided to go back and, beginning with January, use up the rest of the supplies so I can toss the box.

Here is January Card Kit if you don't recall what it looked like:

Ribbon, tickets, these great Kraft colored round stickers, canvas buttons, tons of paper and more! 
I've made a couple of cards already but made a few more the other night.

The first one I actually did a little cross stitching with my We R Memory Keepers Sew Easy and some embroidery floss that was included in the kit.  I will sew on paper but I will throw a shirt out before I will sew a button back on!

The sentiment is hard to read in the picture so here is a closeup:
"Each moment of my life that intersects with me makes me happy."  I love that sentiment.

And here is the other card...made with one of the cute Tim Holtz tickets that came with the kit

That's it for today...hoping to make a few tonight with February's fabulous kit!

I'm entering the second card in the A Blog Named Hero: Challenge #24: Clean Up Your Act HERE.

Happy Crafting!

Tuesday, May 14, 2013

Project Life: Week 18 Right Side: Hero {sm}ARTS Take 2


I've written about my love with Hero Arts many times so I'll not bore you the details at this point.  I know it gets dull hearing about my love for this company.  LOL!  I only love Paul McCartney more!

Not true....

Anyway, here is the right side for my Project Life Week 18 which basically means I am ON TRACK.  I actually finished last week's layout last night for Week 19.  Woohoo!

Here is the right side...complete with more Hero Arts touches:


Do not ask me why the picture on the lower right looks like there is a purple haze around me.  Awful picture but it is what it is!  LOL!

I particularly love the way this card turned out!  Love those Hero Arts ink colors...
The background was stamped with the Tweed background stamp and then I used some other stamps from the Stamp Your Story to journal about sweet little Max, the dog we rescued and found a forever home for. I added a little Washi tape to "bold" it up a bit.


I also love this little journaling card.  I used the Friendly Flags stamp set to make my pennant.  It's not a new set or one in the Stamp Your Story Catalog but it is a great set nonetheless and worked so well for my Project Life.  I also stamped the background with the Newspaper Print stamp and embossed it with some clear embossing powder.

I put a little Studio Calico wood veneer bird on it which I'd inked and loaded up with some Stickles.

The stamp set Tape Your Message has some Washi Tape stamps in it and I used several on the two pages I did but here is an example of one that I stamped...journaled on and then just cut out.


The Hero Arts Products I are:

Friendly Flags
Tape Your Message
Today
Newspaper Background

Inks:
Garden Hills
Soft Purple
Cornflower
Bubblegum

Sea Layering Papers

Such fun to do!!!

I'm entering my layout in the Hero Arts Stamp Your Story Contest found HERE.

Happy Crafting!


Sunday, May 12, 2013

Project Life: Week 18 and HERO {sm}ARTS! Left Side

I love Hero Arts.  I've written about it several times in the past.  I have had a long standing love affair with this brilliant stamp company since I first stamped with one of the fine stamps this company manufactures over 10 years ago.  I have used many, many Hero Arts products in my cardmaking and scrapbooking over the years.

Hero Arts has just released the new catalog titled "Stamp Your Story".  There are some wonderful new stamps being released soon....I already have a couple of the sets on my wish list.  Hero Arts is doing a contest where the requirement is to use at least one stamp set from the new catalog in a project.  I looked through the catalog and since I am a Hero Arts stamp collector extraordinaire I saw that I had several of the sets and decided to use them in Project Life.  Perfect.  I could use plain white pieces of paper and dress them up with inks, embossing powders.  What a novel idea!  Hero {sm}Arts....that's me.

So without further ado...here is the left side for my Hero Arts laden layout:

 The first card "Take Note" was cut out on my Silhouette...oh yes, my Cameo loves being the host to Hero Arts!  I used Hero Arts layering papers and stamped the journaling box with a Hero Arts, of course, stamp.  (I'll list all HA supplies below.)  The little birds are wood veneers from Recollections and were inked and "Stickled".
 My "Week 18" card was a lot of fun to make.  I did the background with the HA newspaper stamp and embossed it with black embossing powder.  I added some stickers from my stash for the letters and then stamped onto some white medical tape to make my own Washi Tape with some HA stamps.  And then I added a couple of sparkly buttons.
I love, love, love the way this card below came out.  I cut the drama masks with my Cameo but the background is all stamping.  I used a huge background stamp and some HA ink and then used a circle stamp with some other colors to create the background.  Love the colors.  I added a little Washi tape as you can see.
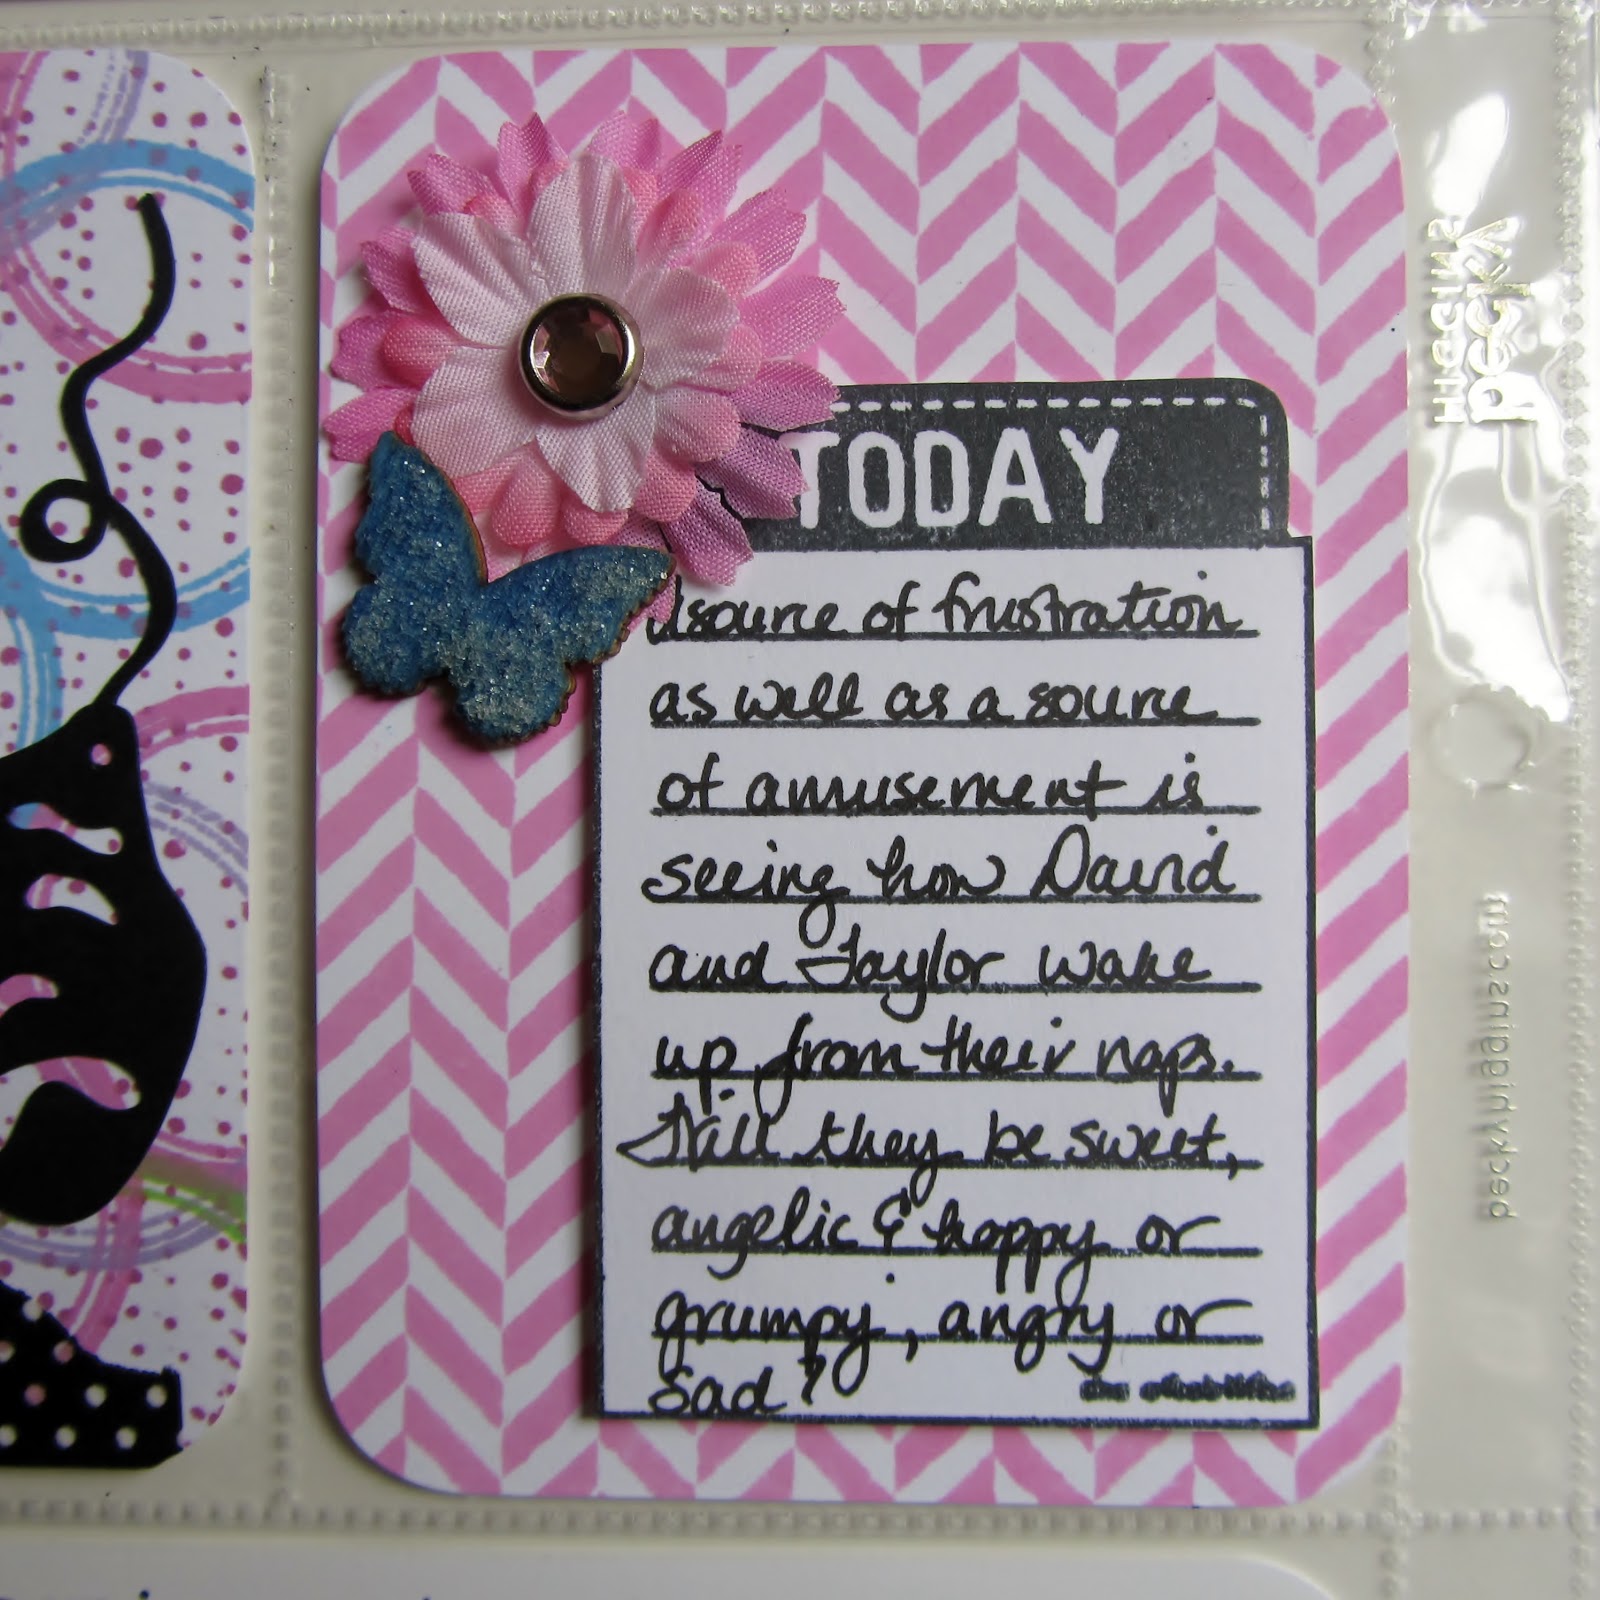
 The card below was stamped with the Tweeds background stamp such a cool stamp!) and another stamp was used for the journaling box.  I added a little flower and inked and Stickled butterfly to the card to 'oomph' it up a bit.

My friend, Donna Gibson, who is on the Creative Team for Becky Higgins' Project Life shared this very cool idea a week or so ago where she scrapbooked her adorable grandson's video and you can see it HERE. So very cute!  Now, how do you do that, you ask?  Well...it is ridiculously easy....you basically upload your video to a sharing site....like Youtube...get the link and then get a QR code for it.  What does QR code stand for?  Quick Response.  I did not know that but once again Google and Wikipedia to the rescue.
Anyway, I did my own of my very adorable grandson who is singing happy birthday to me.  The photo of him is a screenshot from the video and did not turn out well but things like that don't bother me so much anymore.  You know?
Here is my QR code and how it was printed out:

Is that not the coolest thing ever?  You can actually scrapbook your video now!  Wow!  Technology is amazing!

Here is a listing of the Hero Arts supplies I used:
Stamps:
Tape Your Message
Today
Newspaper Background
Tiny Ink Spots Background
Tweed Background

Inks:
Green Hills
Cornflower
Soft Purple
Bubble Gum

 Sea Layering Papers

And I am entering this in the Hero Arts Stamp Your Story Contest which you can see HERE.

And lastly....a very Happy Mother's Day to all of you mothers out there and if you still have your mother, please give her a hug....my mom is no longer here and I miss her every day!

Happy Crafting!